Windows
SWFUpload
英文原文:
Why Spring Boot?
Spring 是一个十分盛行的基于Java言语的开辟框架,此框架用来构建web和企业使用顺序。与很多其他仅存眷一个范畴的框架分歧,Spring框架供给了普遍的功用,经过其组合项目知足当代营业需求。
Spring框架供给了以多种方法设置装备摆设bean的灵敏性,例如XML,注解和JavaConfig。跟着功用数目的增加,庞杂性也会增加,设置装备摆设Spring使用顺序变得有趣且轻易犯错。
Spring团队创立了Spring Boot来处理设置装备摆设的庞杂性。
但在深化了解SpringBoot之前,我们将疾速阅读一下Spring框架,看看SpringBoot试图处理的问题是甚么。
在本文中,我们将引见:
Spring 框架概述
假如你是 Java 开辟职员,那末你多数传闻过 Spring 框架,乃至可能在项目中运用过这一框架。Spring 框架首要来源于一个依靠注入容器,但它远不止于此。
Spring 之所以盛行,是由于:
Spring 除框架以外,另有非常多姊妹项目可以助力构建知足当代营业需求的使用顺序:
Spring Data:为拜访关系型数据库或 NoSQL 数据库供给便当。
Spring Batch:弱小的批处置框架。
Spring Security:为平安使用而生的强壮的平安框架。
Spring Social:支撑整合社区收集,比方 Facebook、Twitter、LinkedIn、Github 等。
Spring Integration:企业级集成模子的完成,运用轻量级的音讯通报和声明式适配器与其他企业使用集成。
另有很多其他风趣的项目,他们用于处理各类当代使用开辟需求。欲知概况,请看 http://spring.io/projects。
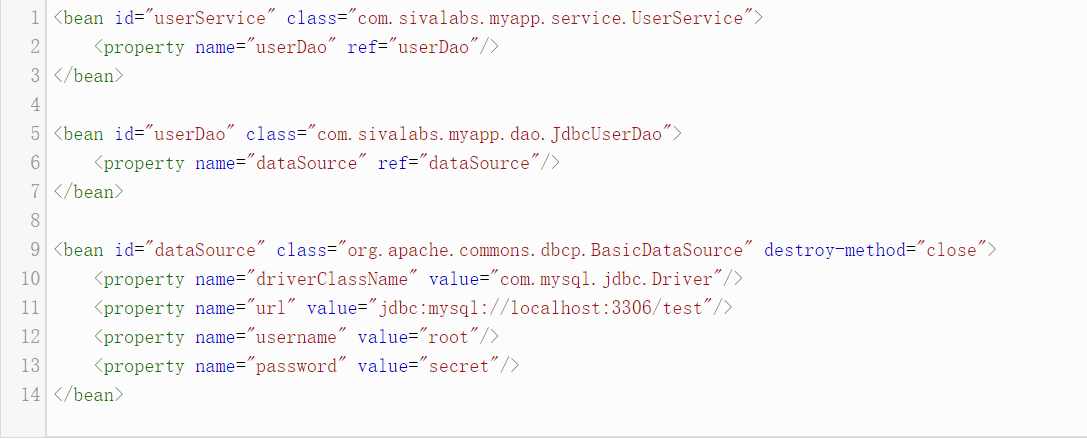
Spring 框架一开端供给了基于 XML 的办法来设置装备摆设 Bean。以后 Spring 引入了基于 XML 的 DSL、注解和 JavaConfig 来设置装备摆设 Bean 的办法。
让我们疾速看看每种设置装备摆设方法的模样。
基于XML的设置装备摆设
基于注释的设置装备摆设

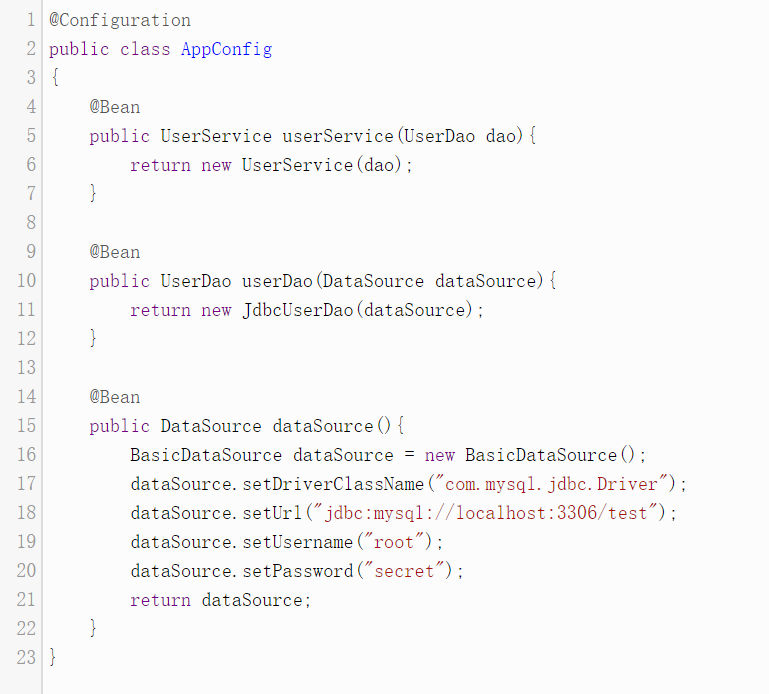
基于JavaConfig的设置装备摆设
哇... Spring供给了非常多办法来做异样的工作,我们乃至可以混杂运用这些办法,并在统一个使用顺序中同时运用基于JavaConfig和注解的设置装备摆设方法。
可是没有一种合适一切类型的处理计划。必需依据本人的使用需求选择办法。
好了,如今您曾经看到了各类款式的Spring bean设置装备摆设的例子。
让我们疾速阅读一下典范的SpringMVC + JPA / Hibernate Web使用顺序设置装备摆设的模样。
运用Spring MVC和JPA(Hibernate)的Web使用顺序
在了解SpringBoot是甚么和供给了甚么样的功用之前,让我们先看看典范的Spring Web使用顺序设置装备摆设怎么,难点又是甚么,其次我们阐述SpringBoot将怎么处理这些问题。
第1步:设置装备摆设Maven依靠项
重要的是我们需求设置装备摆设pom.xml中所需的一切依靠项。
<?xml version="1.0" encoding="UTF-8"?>

<project xmlns="http://maven.apache.org/POM/4.0.0"

    xmlns:xsi="http://www.w3.org/2001/XMLSchema-instance"

    xsi:schemaLocation="http://maven.apache.org/POM/4.0.0

                        http://maven.apache.org/maven-v4_0_0.xsd">

    <modelVersion>4.0.0</modelVersion>

    <groupId>com.sivalabs</groupId>

    <artifactId>springmvc-jpa-demo</artifactId>

    <packaging>war</packaging>

    <version>1.0-SNAPSHOT</version>

    <name>springmvc-jpa-demo</name>


    <properties>

        <project.build.sourceEncoding>UTF-8</project.build.sourceEncoding>

        <maven.compiler.source>1.8</maven.compiler.source>

        <maven.compiler.target>1.8</maven.compiler.target>

        <failOnMissingWebXml>false</failOnMissingWebXml>

    </properties>


    <dependencies>

        <dependency>

            <groupId>org.springframework</groupId>

            <artifactId>spring-webmvc</artifactId>

            <version>4.2.4.RELEASE</version>

        </dependency>

        <dependency>

            <groupId>org.springframework.data</groupId>

            <artifactId>spring-data-jpa</artifactId>

            <version>1.9.2.RELEASE</version>

        </dependency>

        <dependency>

            <groupId>org.slf4j</groupId>

            <artifactId>jcl-over-slf4j</artifactId>

            <version>1.7.13</version>

        </dependency>

        <dependency>

            <groupId>org.slf4j</groupId>

            <artifactId>slf4j-api</artifactId>

            <version>1.7.13</version>

        </dependency>

        <dependency>

            <groupId>org.slf4j</groupId>

            <artifactId>slf4j-log4j12</artifactId>

            <version>1.7.13</version>

        </dependency>

        <dependency>

            <groupId>log4j</groupId>

            <artifactId>log4j</artifactId>

            <version>1.2.17</version>

        </dependency>

        <dependency>

            <groupId>com.h2database</groupId>

            <artifactId>h2</artifactId>

            <version>1.4.190</version>

        </dependency>

        <dependency>

            <groupId>commons-dbcp</groupId>

            <artifactId>commons-dbcp</artifactId>

            <version>1.4</version>

        </dependency>

        <dependency>

            <groupId>mysql</groupId>

            <artifactId>mysql-connector-java</artifactId>

            <version>5.1.38</version>

        </dependency>

        <dependency>

            <groupId>org.hibernate</groupId>

            <artifactId>hibernate-entitymanager</artifactId>

            <version>4.3.11.Final</version>

        </dependency>

        <dependency>

            <groupId>javax.servlet</groupId>

            <artifactId>javax.servlet-api</artifactId>

            <version>3.1.0</version>

            <scope>provided</scope>

        </dependency>

        <dependency>

            <groupId>org.thymeleaf</groupId>

            <artifactId>thymeleaf-spring4</artifactId>

            <version>2.1.4.RELEASE</version>

        </dependency>

    </dependencies>

</project>
我们曾经设置装备摆设好了一切Maven jar依靠项,包含Spring MVC,Spring Data JPA,JPA / Hibernate,Thymeleaf和Log4j。
第 2 步:运用 JavaConfig 设置装备摆设 Service/DAO 层的 Bean
@Configuration

@EnableTransactionManagement

@EnableJpaRepositories(basePackages="com.sivalabs.demo")

@PropertySource(value = { "classpath:application.properties" })

public class AppConfig

{

    @Autowired

    private Environment env;


    @Bean

    public static PropertySourcesPlaceholderConfigurer placeHolderConfigurer()

    {

        return new PropertySourcesPlaceholderConfigurer();

    }


    @Value("${init-db:false}")

    private String initDatabase;


    @Bean

    public PlatformTransactionManager transactionManager()

    {

        EntityManagerFactory factory = entityManagerFactory().getObject();

        return new JpaTransactionManager(factory);

    }


    @Bean

    public LocalContainerEntityManagerFactoryBean entityManagerFactory()

    {

        LocalContainerEntityManagerFactoryBean factory = new LocalContainerEntityManagerFactoryBean();


        HibernateJpaVendorAdapter vendorAdapter = new HibernateJpaVendorAdapter();

        vendorAdapter.setGenerateDdl(Boolean.TRUE);

        vendorAdapter.setShowSql(Boolean.TRUE);


        factory.setDataSource(dataSource());

        factory.setJpaVendorAdapter(vendorAdapter);

        factory.setPackagesToScan("com.sivalabs.demo");


        Properties jpaProperties = new Properties();

        jpaProperties.put("hibernate.hbm2ddl.auto", env.getProperty("hibernate.hbm2ddl.auto"));

        factory.setJpaProperties(jpaProperties);


        factory.afterPropertiesSet();

        factory.setLoadTimeWeaver(new InstrumentationLoadTimeWeaver());

        return factory;

    }


    @Bean

    public HibernateExceptionTranslator hibernateExceptionTranslator()

    {

        return new HibernateExceptionTranslator();

    }


    @Bean

    public DataSource dataSource()

    {

        BasicDataSource dataSource = new BasicDataSource();

        dataSource.setDriverClassName(env.getProperty("jdbc.driverClassName"));

        dataSource.setUrl(env.getProperty("jdbc.url"));

        dataSource.setUsername(env.getProperty("jdbc.username"));

        dataSource.setPassword(env.getProperty("jdbc.password"));

        return dataSource;

    }


    @Bean

    public DataSourceInitializer dataSourceInitializer(DataSource dataSource)

    {

        DataSourceInitializer dataSourceInitializer = new DataSourceInitializer();

        dataSourceInitializer.setDataSource(dataSource);

        ResourceDatabasePopulator databasePopulator = new ResourceDatabasePopulator();

        databasePopulator.addScript(new ClassPathResource("data.sql"));

        dataSourceInitializer.setDatabasePopulator(databasePopulator);

        dataSourceInitializer.setEnabled(Boolean.parseBoolean(initDatabase));

        return dataSourceInitializer;

    }

}
在 AppConfig.java 所描绘的设置装备摆设类中,我们做了下面的工作:
运用 @Configuration 注解使之成为 Spring 设置装备摆设类。
运用 @EnableTransactionManagement 注解答应基于注解的事务治理。
设置装备摆设 @EnableJpaRepositories 唆使在那里寻觅 Spring Data JPA 库。
Configured PropertyPlaceHolder bean u运用 @PropertySource 注解和 PropertySourcesPlaceholderConfigurer 界说来设置装备摆设 PropertyPlaceHolder Bean。设置装备摆设属性来自 application.properties 文件。
为 DataSource、JPA EntityManagerFactory 和 JpaTransactionManager 界说 Bean。
设置装备摆设 DataSourceInitializer Bean,使之在使用启动时履行 data.sql 剧本,初始化数据库。
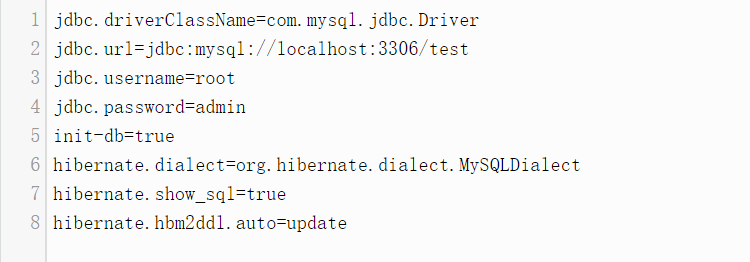
我们需求在 application.properties 中设置装备摆设占位属性值:
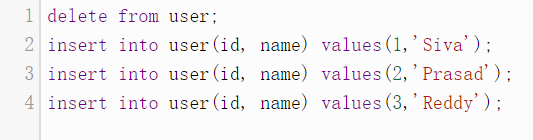
创立容易的 SQL 剧本,data.sql,将示例数据填入 USER 表中:
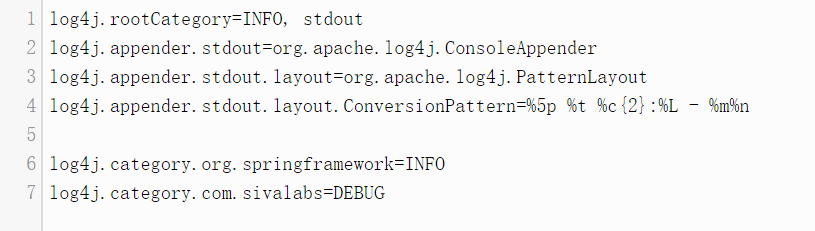
创立 log4j.properties 文件,在此中写一些根底设置装备摆设:
第3步:设置装备摆设Spring MVC Web层Beans
我们必需设置装备摆设Thymeleaf ViewResolver,静态ResourceHandlers,实用于国际化的MessageSource,等等。
@Configuration

@ComponentScan(basePackages = { "com.sivalabs.demo"})

@EnableWebMvc

public class WebMvcConfig extends WebMvcConfigurerAdapter

{

    @Bean

    public TemplateResolver templateResolver() {

        TemplateResolver templateResolver = new ServletContextTemplateResolver();

        templateResolver.setPrefix("/WEB-INF/views/");

        templateResolver.setSuffix(".html");

        templateResolver.setTemplateMode("HTML5");

        templateResolver.setCacheable(false);

        return templateResolver;

    }


    @Bean

    public SpringTemplateEngine templateEngine() {

        SpringTemplateEngine templateEngine = new SpringTemplateEngine();

        templateEngine.setTemplateResolver(templateResolver());

        return templateEngine;

    }


    @Bean

    public ThymeleafViewResolver viewResolver() {

        ThymeleafViewResolver thymeleafViewResolver = new ThymeleafViewResolver();

        thymeleafViewResolver.setTemplateEngine(templateEngine());

        thymeleafViewResolver.setCharacterEncoding("UTF-8");

        return thymeleafViewResolver;

    }


    @Override

    public void addResourceHandlers(ResourceHandlerRegistry registry)

    {

        registry.addResourceHandler("/resources/**").addResourceLocations("/resources/");

    }


    @Override

    public void configureDefaultServletHandling(DefaultServletHandlerConfigurer configurer)

    {

        configurer.enable();

    }


    @Bean(name = "messageSource")

    public MessageSource configureMessageSource()

    {

        ReloadableResourceBundleMessageSource messageSource = new ReloadableResourceBundleMessageSource();

        messageSource.setBasename("classpath:messages");

        messageSource.setCacheSeconds(5);

        messageSource.setDefaultEncoding("UTF-8");

        return messageSource;

    }

}在我们的WebMvcConfig.java设置装备摆设类中我们完成以下操纵:
运用@Configuration注解将其标志为Spring设置装备摆设类。
运用@EnableWebMvc启用基于注解的Spring MVC设置装备摆设,
经过注册TemplateResolver, SpringTemplateEngine, ThymeleafViewResolver Bean来设置装备摆设Thymeleaf ViewResolver。
注册ResourceHandlers Bean标明URI/resources/**静态资本恳求将由当地/resources/目次供给办事。
设置装备摆设MessageSource Bean经过ResourceBundle加载classpath下的messages-{country-code}.properties国际化信息。
今朝我们没有要设置装备摆设的信息,所以在src/main/resources文件夹下创立一个空的messages.properties文件。
第4步:注册Spring MVC FrontController Servlet DispatcherServlet
在Servlet 3.x标准之前我们必需在web.xml注册Servlets/Filters。自从Servlet 3.x标准出台我们可以运用ServletContainerInitializer以编程方法注册Servlets/Filters。
Spring MVC供给了一个便利的类AbstractAnnotationConfigDispatcherServletInitializer用于注册DispatcherServlet.
public class SpringWebAppInitializer extends AbstractAnnotationConfigDispatcherServletInitializer

{


    @Override

    protected Class<?>[] getRootConfigClasses()

    {

        return new Class<?>[] { AppConfig.class};

    }


    @Override

    protected Class<?>[] getServletConfigClasses()

    {

        return new Class<?>[] { WebMvcConfig.class };

    }


    @Override

    protected String[] getServletMappings()

    {

        return new String[] { "/" };

    }


    @Override

    protected Filter[] getServletFilters() {

       return new Filter[]{ new OpenEntityManagerInViewFilter() };

    }

}
在SpringWebAppInitializer.java中我们曾经完成了以下的工作:
设置装备摆设了AppConfig.class 作为 RootConfirationClasses ,它将成为包括一切子高低文(DispatcherServlet)同享的bean界说的父ApplicationContext。
设置装备摆设WebMvcConfig.class作为ServletConfigClasses,它是包含WebMvc bean界说的子ApplicationContext。
设置装备摆设ServletMapping为"/",让DispatcherServlet处置一切恳求。
注册OpenEntityManagerInViewFilter过滤器,用于睁开视图时懒加载JPA实体聚集。
第五步:创立JPA实体和Spring Data JPA repository
创立JPA实体User.java和User实体对应的Spring Data JPA repository。
@Entity

public class User

{

    @Id @GeneratedValue(strategy=GenerationType.AUTO)

    private Integer id;

    private String name;


    //setters and getters

}

public interface UserRepository extends JpaRepository<User, Integer>

{

}
第六步:创立Spring MVC把持器
创立SpringMVC把持器来处置"/"URL恳求并前往用户列表。
@Controller

public class HomeController

{

    @Autowired UserRepository userRepo;


    @RequestMapping("/")

    public String home(Model model)

    {

        model.addAttribute("users", userRepo.findAll());

        return "index";

    }

}
第七步:创立Thymeleaf视图:/WEB-INF/views/index.html来展现用户列表
<!DOCTYPE html>

<html xmlns="http://www.w3.org/1999/xhtml"

      xmlns:th="http://www.thymeleaf.org">

<head>

<meta charset="utf-8"/>

<title>Home</title>

</head>

<body>

    <table>

        <thead>

            <tr>

                <th>Id</th>

                <th>Name</th>

            </tr>

        </thead>

        <tbody>

            <tr th:each="user : ${users}">

                <td th:text="${user.id}">Id</td>

                <td th:text="${user.name}">Name</td>

            </tr>

        </tbody>

    </table>

</body>

</html>我们预备好运转顺序啦。但在此之前,我们需求下载和设置装备摆设诸如Tomcat或许Jetty或许Wilddfly等容器。
你可以下载Tomcat 8并在你爱好运用的IDE中设置装备摆设并运转。然后翻开阅读器拜访http://localhost:8080/springmvcjpa-demo。你可以看到user的具体列表。
耶...我们做到了。
可是等一下~这不是花了十分多的任务量才干做一个从数据库中读取并显示用户列表信息吗?
我们公平公道来看问题。一切的这类设置装备摆设其实不只是一个用户案例。这个设置装备摆设也是使用顺序其它部分的根底。
回过火来,假如你只是想疾速取得和运转一个使用来讲这是在是太费事太庞杂了。
另外一个问题是,假如你想开辟另外一个有相似技巧栈的 SpringMVC 使用吗?
好的,你可能为了拷贝粘贴这些设置装备摆设而觉得忧?。是吗?提出一个影象深入的问题:假如你要做相似的工作反复一遍又一遍,那末你是否是想寻觅一个能主动处置的方法处理问题。
各类疏散的设置装备摆设写了一遍又一遍,你会想到这里会有一些其他的费事问题吗?
好的,在这让我把这些我能想到的问题列出。
你需求留意一切的类库的兼容性与 Spring 版本搭配和设置装备摆设。
在设置装备摆设外面有 95% 的工夫我们都是在设置装备摆设 DataSource,EntityManagerFactory,TransactionManger 之类的实体。但假如 Spring 可以主动的为我们完成这些设置装备摆设岂不是更好啊。
相似的设置装备摆设 SpringMVC 实体类比方 ViewResolver、MessageSource 等又需求花更多的任务工夫了。
想想,要如何才干让 Spring 可以主动化的完成设置装备摆设实体?怎样你才可以疾速容易的运用基于可定制的属性完成主动的设置装备摆设呢?
比方,将 DispacherServlet 的 url-pattern 映照 "/" 映照到 "/app/"。将 “/WEB-INF/views” 目次 交换为在 "/WEB-INF/templates/" 目次参加 Thymeleaf 视图。
所以根本上,你盼望 Spring 主动履行一些操纵,可是又可以供给更容易的方法灵敏的供给重写默许设置装备摆设?
好的,如今你正在走进 Spring Boot 的天下在外面你所等待已久的那些工具都曾经有了!!!
疾速上手品尝 Spring Boot
欢送离开 Spring Boot 天下!Spring Boot 并非需求你完整地存眷和把握非常多工具。它可以默许的完成主动化的设置装备摆设可是你又可以按本人的需求去从头设置装备摆设恣意设置装备摆设。
比拟我更爱好用一个例子来讲明而不是更多的剖析。
所以让我们如今开端用 Spring Boot 来疾速构建一个使用。
Step 1:创立一个 Spring Boot 的 Maven 项目
创立一个 Maven 项目和(在 pom.xml 外面)设置装备摆设项目 jar 包依靠以下:
<?xml version="1.0" encoding="UTF-8"?>

<project xmlns="http://maven.apache.org/POM/4.0.0"

        xmlns:xsi="http://www.w3.org/2001/XMLSchema-instance"

        xsi:schemaLocation="http://maven.apache.org/POM/4.0.0

                        http://maven.apache.org/maven-v4_0_0.xsd">

    <modelVersion>4.0.0</modelVersion>

    <groupId>com.sivalabs</groupId>

    <artifactId>hello-springboot</artifactId>

    <packaging>jar</packaging>

    <version>1.0-SNAPSHOT</version>

    <name>hello-springboot</name>


    <parent>

        <groupId>org.springframework.boot</groupId>

        <artifactId>spring-boot-starter-parent</artifactId>

        <version>1.3.2.RELEASE</version>

    </parent>


    <properties>

        <project.build.sourceEncoding>UTF-8</project.build.sourceEncoding>

        <java.version>1.8</java.version>

    </properties>


    <dependencies>

        <dependency>

            <groupId>org.springframework.boot</groupId>

            <artifactId>spring-boot-starter-test</artifactId>

        </dependency>

        <dependency>

            <groupId>org.springframework.boot</groupId>

            <artifactId>spring-boot-starter-data-jpa</artifactId>

        </dependency>

        <dependency>

            <groupId>org.springframework.boot</groupId>

            <artifactId>spring-boot-starter-web</artifactId>

        </dependency>

        <dependency>

            <groupId>org.springframework.boot</groupId>

            <artifactId>spring-boot-starter-thymeleaf</artifactId>

        </dependency>

        <dependency>

            <groupId>org.springframework.boot</groupId>

            <artifactId>spring-boot-devtools</artifactId>

        </dependency>

        <dependency>

            <groupId>mysql</groupId>

            <artifactId>mysql-connector-java</artifactId>

        </dependency>

    </dependencies>

</project>
哇本来 pom.xml 的设置装备摆设这么少觉得容易多了!
Step 2:在 application.properties 中设置装备摆设数据源或JPA 属性设置装备摆设以下:
spring.datasource.driver-class-name=com.mysql.jdbc.Driver

spring.datasource.url=jdbc:mysql://localhost:3306/test

spring.datasource.username=root

spring.datasource.password=admin

spring.datasource.initialize=true

spring.jpa.hibernate.ddl-auto=update

spring.jpa.show-sql=true
你可以拷贝一些相似 data.sql 的文件到 src/main/resources 目次中。
Step 3:创立一些 JAP 实体类和实体类所需求的 Spring Data JAP Repository 接口
在 springmvc-jpa-demo 使用项目中创立 User.java,UserRepository.java 和 HomeController.java 之类所需的工具。
Step 4:用 Thymeleaf 模板言语创立一个显示用户列表的视图
在 springmvc-jap-demo 使用拷贝 /WEB-INF/views/index.html 到我们的新项目标 src/main/resources/templates 目次中。
Step 5:创立一个 SpringBoot 启动进口实体的类
创立一个有 main 函数的 Java 类 Application.java 以下:
@SpringBootApplication

public class Application

{

    public static void main(String[] args)

    {

        SpringApplication.run(Application.class, args);

    }

}
如今用 Java Application 的方法开端启动运转 Application.java 以后翻开阅读器拜访 http://localhost:8080/。
你就能够在页面的表格上看到用户列表的显示。这觉得真实太酷了!!!
OK 好的,我想你会高声说"这里边究竟发作了做了些甚么???"。
本文中的一切译文仅用于进修和交换目标,转载请务必注明文章译者、出处、和本文链接。
2KB翻译任务按照
CC 协定,假如我们的任务有进犯到您的权益,请实时联络我们。

2KB项目(www.2kb.com,源码交易平台),提供担保交易、源码交易、虚拟商品、在家创业、在线创业、任务交易、网站设计、软件设计、网络兼职、站长交易、域名交易、链接买卖、网站交易、广告买卖、站长培训、建站美工等服务


