HornetQ
ActiveMQ
stomp
WebSocket
英文原文:
Easy Messaging with STOMP over WebSockets using ActiveMQ and HornetQ
对于在不同层级上构建分布式软件系统来说,消息机制是一个非常强大的工具。通常来说,至少在 Java 生态圈内,客户端 (前端) 从来不会直接和消息中间件(或交换器) 进行交互,而是去调用服务器端 (后端)的服务。或者说,客户端甚至都没有意识到还存在着消息解决方案。
随着 Websockets 得到了越来越多的使用,以及面向文本的协议的广泛支持,比如STOMP (用来和消息中间件或交换器进行通讯) ,情况正在有所改变。 今天的这篇博文将试图解释下面的事情是多么容易,即通过使用基于Websockets的STOMP 协议,把两个非常流行的 JMS 实现 Apache ActiveMQ 和 JBoss HornetQ 提供给 web 前端 (JavaScript) 来使用。
在深入代码之前,也许有人会说这样做不是一个好主意。那么我们的目的是什么呢? 答案真的取决于:
- 你在开发的是概念的原型/证明,你需要一个简易的方式来整合发布/订阅或者点到点的消息发送
- 你不想要/需要 构建复杂精致的架构,最简单的能运行的解决方案就足够了
这里可扩展性,容错性和其它一些重要的决定因素都没有考虑在内,但是如果你想要开发具有鲁棒性和弹性的架构,这些绝对是应当考虑的。
好,让我们开始吧。从我们正在尝试解决的问题来入手总是更好一些: 我们想要开发一个简单的发布/订阅解决方案,来使那些用JavaScript 编写的 web 客户端可以发送消息并监听特定的主题。任何时候接收到任何消息时,客户端就会展示一个弹出窗口。请注意,我们需要使用现代浏览器,它要能够支持 Websockets,比如 Google Chrome 或者 Mozilla Firefox.
我们的两个例子中客户端代码都是一样的,所以我们就从那儿开始。一个很棒的学习起点是一篇叫做 STOMP Over WebSocket 的文章,它介绍了 stomp.js 组件,下面是我们的 index.html:
<script src="stomp.js"></script>

<script type="text/javascript">
 var client = Stomp.client( "ws://localhost:61614/stomp", "v11.stomp" );

 client.connect( "", "",
  function() {
      client.subscribe("jms.topic.test",
       function( message ) {
           alert( message );
          },
    { priority: 9 }
      );

   client.send("jms.topic.test", { priority: 9 }, "Pub/Sub over STOMP!");
  }
 );

</script>
很简单的代码,不过仍有几个细节值得解释一下。首先,我们在 ws://localhost:61614/stomp 寻找 Websockets 终端。在本机部署时这是没问题的,但是最好用真实的 IP 地址或者主机名来替代 localhost 。其次,一旦连接成功, 客户端会去订阅主题(只对优先级为 9的消息感兴趣) ,随后立即给该主题发送消息。从客户端的角度来看,我们已经完成了所有工作。
让我们继续来看看消息中间件,首先是 Apache ActiveMQ。为了简化例子,我们会把 Apache ActiveMQ 中间件嵌入到一个简单的不需要XML配置文件的 Spring 应用中。因为源代码已经在 GitHub 上提供了,我将跳过 POM 文件片段,只展示代码部分:
package com.example.messaging;

import java.util.Collections;

import org.apache.activemq.broker.BrokerService;
import org.apache.activemq.broker.jmx.ManagementContext;
import org.apache.activemq.command.ActiveMQDestination;
import org.apache.activemq.command.ActiveMQTopic;
import org.apache.activemq.hooks.SpringContextHook;
import org.springframework.context.annotation.Bean;
import org.springframework.context.annotation.Configuration;

@Configuration
public class AppConfig {
    @Bean( initMethod = "start", destroyMethod = "stop" )
    public BrokerService broker() throws Exception {
        final BrokerService broker = new BrokerService();
        broker.addConnector( "ws://localhost:61614" );
        broker.setPersistent( false );
        broker.setShutdownHooks( Collections.< Runnable >singletonList( new SpringContextHook() ) );

        final ActiveMQTopic topic = new ActiveMQTopic( "jms.topic.test" );
        broker.setDestinations( new ActiveMQDestination[] { topic }  );

        final ManagementContext managementContext = new ManagementContext();
        managementContext.setCreateConnector( true );
        broker.setManagementContext( managementContext );

        return broker;
    }
}
正如我们可以看到的,ActiveMQ 中间件被配置为使用 ws://localhost:61614 链接,并假定它使用 STOMP 协议。并且,我们创建了名为 jms.topic.test 的 JMS 主题,启用了 JMX 管理。要运行它,使用 Starter 类:
package com.example.messaging;

import org.springframework.context.ApplicationContext;
import org.springframework.context.annotation.AnnotationConfigApplicationContext;

public class Starter  {
    public static void main( String[] args ) {
        ApplicationContext context = new AnnotationConfigApplicationContext( AppConfig.class );
    }
}
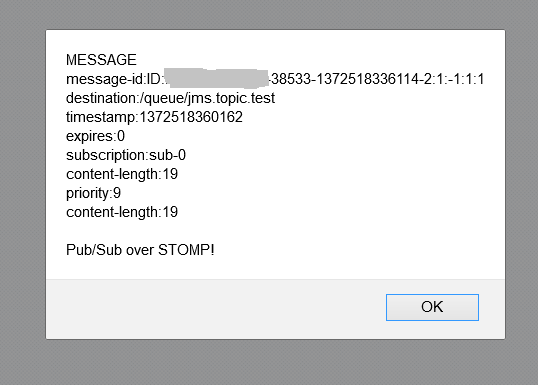
现在,走起,开始运行,让我们在浏览器中打开 index.html 文件,我们应当可以看见类似下面的内容:
简单吧! 有求知欲的读者们请注意,为了支持 Websockets,ActiveMQ 需要使用 Jetty 7.6.7.v20120910 ,最新的 Jetty 发布版不管用。
继续,考虑到 HornetQ 的特点,下面的实现看起来有些不同,不过仍然不太复杂。由于 Starter 类跟原来一样,所以唯一改变的是配置:
package com.example.hornetq;

import java.util.Collections;
import java.util.HashMap;
import java.util.Map;

import org.hornetq.api.core.TransportConfiguration;
import org.hornetq.core.config.impl.ConfigurationImpl;
import org.hornetq.core.remoting.impl.netty.NettyAcceptorFactory;
import org.hornetq.core.remoting.impl.netty.TransportConstants;
import org.hornetq.core.server.JournalType;
import org.hornetq.jms.server.config.ConnectionFactoryConfiguration;
import org.hornetq.jms.server.config.JMSConfiguration;
import org.hornetq.jms.server.config.TopicConfiguration;
import org.hornetq.jms.server.config.impl.ConnectionFactoryConfigurationImpl;
import org.hornetq.jms.server.config.impl.JMSConfigurationImpl;
import org.hornetq.jms.server.config.impl.TopicConfigurationImpl;
import org.hornetq.jms.server.embedded.EmbeddedJMS;
import org.springframework.context.annotation.Bean;
import org.springframework.context.annotation.Configuration;

@Configuration
public class AppConfig {
    @Bean( initMethod = "start", destroyMethod = "stop" )
    public EmbeddedJMS broker() throws Exception {
        final ConfigurationImpl configuration = new ConfigurationImpl();
        configuration.setPersistenceEnabled( false );
        configuration.setJournalType( JournalType.NIO );
        configuration.setJMXManagementEnabled( true );
        configuration.setSecurityEnabled( false );

        final Map< String, Object > params = new HashMap<>();
        params.put( TransportConstants.HOST_PROP_NAME, "localhost" );
        params.put( TransportConstants.PROTOCOL_PROP_NAME, "stomp_ws" );
        params.put( TransportConstants.PORT_PROP_NAME, "61614" );

        final TransportConfiguration stomp = new TransportConfiguration( NettyAcceptorFactory.class.getName(), params );
        configuration.getAcceptorConfigurations().add( stomp );
        configuration.getConnectorConfigurations().put( "stomp_ws", stomp );

        final ConnectionFactoryConfiguration cfConfig = new ConnectionFactoryConfigurationImpl( "cf", true, "/cf" );
        cfConfig.setConnectorNames( Collections.singletonList( "stomp_ws" ) );

        final JMSConfiguration jmsConfig = new JMSConfigurationImpl();
        jmsConfig.getConnectionFactoryConfigurations().add( cfConfig );

        final TopicConfiguration topicConfig = new TopicConfigurationImpl( "test", "/topic/test" );
        jmsConfig.getTopicConfigurations().add( topicConfig );

        final EmbeddedJMS jmsServer = new EmbeddedJMS();
        jmsServer.setConfiguration( configuration );
        jmsServer.setJmsConfiguration( jmsConfig );

        return jmsServer;
    }
}
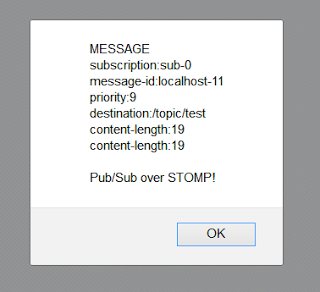
完整的源代码在 GitHub 上。在启动 Starter 类之后,在浏览器中打开 index.html,你将看到的结果应该类似于:

HornetQ 的配置看起来似乎更啰嗦一些,不过除了优秀的 Netty 框架之外,没有牵涉到其他的依赖。
出于我自己的好奇,我用 Apollo 实现替换了 ActiveMQ 中间件。虽然我如期的使它正常运行,但是我发现它的 API 非常笨重,至少在当前的 1.6 版本中是这样,所以在本文中我没有叙及这部分内容。
所有源代码可以从GitHub上获取: Apache ActiveMQ 示例 和 JBoss HornetQ 示例
本文中的所有译文仅用于学习和交流目的,转载请务必注明文章译者、出处、和本文链接。
2KB翻译工作遵照
CC 协议,如果我们的工作有侵犯到您的权益,请及时联系我们。

2KB项目(www.2kb.com,源码交易平台),提供担保交易、源码交易、虚拟商品、在家创业、在线创业、任务交易、网站设计、软件设计、网络兼职、站长交易、域名交易、链接买卖、网站交易、广告买卖、站长培训、建站美工等服务